
Butterfly Girl Jewelry Bag
(one of my new design names = girls who are spreading their wings and flying- right Denise?)

 materials:
 *2 strips 13 x 5.5 inches cut from coordinating fabrics
(I used muslin for the bag lining.)
*16-18 inch piece of 1/2 inch ribbon
*scraps of fleece

Step 1 - Put strips right sides together and sew all the way around leaving a two inch opening about three inches from one of the short ends.

Step 2 - Turn and press, making sure the opening's edges are pressed to the inside. You do not need to sew the opening closed as this will be taken care of in the last step.

Step 3 - On the short ends sew all the way across 5/8 inches from the edge. This will create the tunnel for ribbon later on.
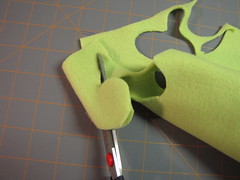
Step 4 - Choose a scrap of fleece, fold in half and free cut out symmetrical butterfly wings on the fold. Keep it under three inches wide. For those who are cutting-handicapped, draw a pattern first. From a coordinating fleece scrap cut an elongated butterfly body.

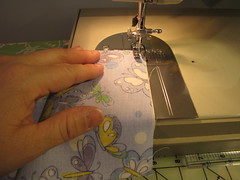
Step 5 - Position butterfly wings on right side of the bag below stitched line and sew1/4 inch all the way around. (Make sure back is not folded in half!) Lay butterfly body on top and sew 1/4 inch around.
Step 6 - Fold bag in half, right sides (outside of bag) together. Starting at stitched line, sew side edges closed with a 1/4 inch seam allowance, leaving top open.

Step 7 - Turn bag right side out. Using sharp snips, carefully cut a vertical slit in the lining 1/2 long at the end of each flap in the bags opening.

Step 8 - Using your handy dandy threading tool (or a safety pin) thread ribbon through all holes. Match up ends and knot together. Pull ribbon and push fabric to create gathered closure.
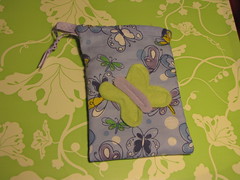

*Place 6-8 small baggies for storing jewelry inside. These help keep jewelry organized and tangle free. It also helps to prevent tarnish on silver jewelry.
Believe it or not this idea came to me driving home from work today. And only about an hour to make two finished and one incomplete (my demo pieces). The fleece butterflies were inspired by fleece flowers I saw in a book somewhere. You cut out a flower shape, layer with a circle center and sew 1/4 inch around the inside of the circle. Then top with a button. I can only imagine what else I can use that technique with. Gotta love fleece! I love having a working studio!
Keep Dreaming...Colleen

0 comments:
Post a Comment